Pomelo Projects


Tuesday, 21 February 2012

Turkish Delight

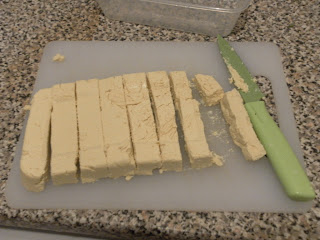
Making Turkish Delight is more chemistry experiment than cookery and for that reason amazingly fun to do. The difficulty is that having made it twice, once with gelatine and once using a traditional recipe, I have not yet succeeding in creating a sweet to rival the shop bought stuff. The problem is texture related. To my mind Turkish Delight should be firmly squidgy but my latest version was described as ‘horribly soft’ – although the cubes hold their shape robustly, the oral experience is a kind of jelly meets paste scenario. Strangely moreish though.

I have not given up a finding a good Turkish Delight recipe, but I thought I would document my experience up to this point nonetheless. Research indicates that what I might be missing is mastika, a resin found in trees and traditionally cultivated on the Greek island of Chios. Apparently this is what chewing gum used to be made of so it can be used to provide a chewy bite to sweets. Although you can buy it in capsule form from health food shops in the UK it seems pretty impossible to get hold of the raw resin. So I’m planning a trip up to Green Lanes in North London to see if the Greek shops there might be able to help. I’ll update as soon as I can for all those that aren’t tempted by horribly soft Turkish Delight. Here’s a traditional recipe anyway.

Necessary equipment: electric whisk, sugar thermometer

Ingredients

800g sugar
120g corn flour
1 tbsp lemon juice
1 tbsp rose water
1 tsp cream of tartar
Few drops red or pink food colouring

For dusting
150g icing sugar
30g corn flour

1) Oil an 8’x8’ (roughly) tin, line it with baking parchment and then oil the parchment too.
2) Put 375ml water, the lemon juice and the sugar in a pan and bring to the boil whilst stirring.
3) Heat to 115C stirring all the time. Turn off heat and set aside.
4) Put 500ml water, the cream of tartar and the corn flour in another pan and bring to the boil whilst whisking all the time with the electric whisk. When it has formed a thick, gluey paste, stop.
5) Bit by bit add the sugar syrup to the corn flour paste and whisk in each addition until it is incorporated. You might want to scrape down the sides a couple of times during this process.
6) Bring the mixture to a gentle boil whilst stirring and then cook it for an hour over a low heat stirring every five minutes or so to prevent it from sticking.
7) Take off the heat and stir in the rose water and colouring.
8) Pour the mixture into the tin and leave to cool and set for a few hours.
9) Once cool remove it onto a work surface dusted with icing sugar and cut into cubes.
10) Store in Tupperware filled with icing sugar and cornflour.

After a couple of days my Turkish Delight started to lose liquid and seemed to be slowly disintegrating into a weeping, sugary morass. I rolled it again in fresh icing sugar to keep the cubes separate. I don’t quite know what the answer to this problem is, or to the question of the bizarre pasty texture, but I will keep investigating and will update soon.

Friday, 3 February 2012

Blackberry Wine


In autumn I normally make sloe gin but there’s no denying it is an expensive endeavour. This year I have been a bit skint so I thought I might try my hand at fermentation. And this time create some free alcohol! And who can resist a forage in the country in the autumn sunshine?

The recipe requires a few specialist ingredients and equipment for wine making. I went to the Home Brew Shop which sells everything you need at very reasonable prices. I bought the majority of the stuff listed below for under £20 (a lot cheaper than buying six bottles of gin for sloes).

Equipment
10 litre fermenting bucket
Two 5 litre demijohns – I just used the cheap plastic ones.
Length of rubber tube (any hardware store sells this)
Muslin (I never used to know where to get muslin from until I discovered you can buy them in the baby aisle of the supermarket)
Funnel

Ingredients
2 kg blackberries
1 tsp pectic enzyme
1.4kg wine sugar
1 tsp yeast nutrient
Wine yeast

1)      Put the blackberries in the fermenting bucket and pour over 4 litres of boiling water. Give it a mash and then put the lid on.
2)      Once cooled, add the pectic enzyme to help it clear and cover again.
3)      One day later add the sugar, the yeast nutrient and the wine yeast, according to the packet instructions.
4)      Cover again and leave for five days, stirring every day.


5)      On the fifth day strain the liquid through a muslin lined funnel into the demijohns.
6)      After about six weeks ‘rack off’ into fresh demijohns. The aim of racking off is to purify the wine by leaving behind the sediment that will have sunk to the bottom. All you do is put your rubber tube into the wine, avoiding touching the very bottom, and give the other end of the tube a brief but firm suck. The second the wine starts to flow, jam it into your fresh demijohn (this can be a pretty tense process). Once the flow is established it will keep going until all the liquid has been sucked up. (Boring NB: with only two demijohns you may have to rack off into the fermenting bucket and then back into the freshly cleaned demijohns.)


7)      Leave for another six weeks or so and then transfer to sterilised bottles. (I saved up a few screwtop wine bottles during this time to have them ready).


Issues:
During the five days that I was stirring my wine I started to notice a pretty horrible sulphurous smell emanating from the blackberry mixture. I was worried the wine had spoiled but I was reassured by a bit of online research into this problem and strained the wine into the demijohns nonetheless. Six weeks later, when racking off, the smell had completely vanished and there’s no hint of it at all when you drink it.

Sterilisation: Incredibly boring but it has to be done. Don’t attempt to sterilise plastic demijohns with boiling water – I succeeded in melting one of mine into a bizarre shape. The easiest way to sterilise glass is to put it into a hot oven for 20 minutes.

Thursday, 2 February 2012

Soda Bread

This is incredibly simple, and a genuine option if you realise at the last minute that you have no bread and can’t be arsed to go out and get some. Soda bread does not rise in the conventional way with yeast, but an interaction takes place between the bicarb and the buttermilk which gives it a rise in the oven. For ultimate impressiveness, this is best made in conjunction with whipping up some homemade butter because a waste product of butter production is buttermilk, which can be used to make soda bread. The butter that I made using 1.2 litres of cream produced exactly 400ml of buttermilk. How very satisfying is that?! Hugh Fearnley-Whittingstall saw me through this one. Recipe here.

500g plain flour
2 tsp bicarbonate of soda
1 tsp salt
400ml buttermilk (or live yoghurt)

1)      Pre-heat the oven to 200C.
2)      Sift all the dry ingredients into a bowl.
3)      Make a well and add the buttermilk.
4)      Stir it all up. It may be quite wet but don’t worry if it is. If it’s dry add a tiny bit of milk.
5)      Flop it out on to a floury surface.
6)      Kneed for a minute, no need for longer.
7)      Mould into a round shape.
8)      Cut a deep cross into the surface.
9)      Bake for 45 minutes.


Butter


Making butter has been on my to do list for some time now, ever since I saw Darina Allen’s piece in the Guardian about how easy it is to do. I knew that to make butter all you have to do is get some cream, whip it and then keep on whipping. And that really is all there is to it. Here is the process for making unsalted butter that worked for me*. I used smaller quantities than Darina which are a bit easier to handle- unsalted butter doesn't last longer in the fridge than a few days so you also need to think about how much of the stuff you're actually going to be able to consume. It's vital to keep all your equipment as cold and sterilised as possible.

*When I say it worked for me, I really should be crediting my sister Cescy, who took the lead on the butter production, and whose freezing skinny fingers you can see in the photos. Here she is doing some whisking in her coat:


1)      Put a large mixing bowl, your whisk attachments and a sieve into the fridge a couple of hours before you begin.
2)      Leave 1.2 litres of cream out of the fridge for a couple of hours as well.
3)      Pour the cream into the cold bowl and start whipping. After it has past the stage of looking like stiffly whipped cream, it starts to become more yellow and begins to look like pale scrambled egg. A faint sloshing sound starts to be heard as the buttermilk is released, becoming more audible until the whisk is clogged with thick globules of butter.
4)      When you feel you can whisk no more, pour the whole lot through the sieve with a bowl underneath to collect the buttermilk (this has its uses, particularly in making soda bread).
5)      Put the butter back into the bowl and whisk for a minute more to release even more buttermilk. Drain again.
6)      Fill the bowl with very cold water and squeeze the butter to release as much buttermilk as possible. Drain and repeat until the water in the bowl remains clear.
7)      With cold hands and as quickly as possible, form the butter into pats.


To make salted butter you need to seek out some dairy salt which is just a very pure type of salt. I have done some cursory googling but I’m afraid it doesn’t seem very easy to come by so I’m inclined to advise keeping homemade butter unsalted. But there are all kinds of flavours you can add to your butter – herbs, garlic, brandy – if you can bear to sully its pale beauty. 

Wednesday, 1 February 2012

Scotch Eggs


This is such an easy one and a recipe that reaps an ordinate amount of glory. Scotch eggs are such showstoppers at a picnic but they are truly divine hot and straight from the oven. You can buy sausage meat and season it with herbs, but I think that stuff is often pretty low grade, so I tend to buy some nice sausages and squidge them out of the skins.

Pack of 8 sausages
6 eggs
2 slices of bread


1) Boil the eggs for 4 minutes (put them into boiling water, not cold).
2) Blitz the bread in a blender till crumby.
3) Once cooked, plunge the eggs into cold water and peel them.
4) Pack the sausage meat evenly round them.
5) Roll the sausage covered eggs around in the breadcrumbs
6) Bake for 20 minutes at 180C.


Sometimes the sausage meat splits a little bit along the join but it doesn’t really matter, they just look even more rustic. If you want perfect scotch eggs, it helps to place them on the baking tray with the seam of sausage meat on the bottom, so that the top doesn’t split open.

Friday, 27 January 2012

Tofu

I have recently been in the grip of a tofu making obsession. Until a few weeks ago I had never actually cooked tofu myself. I had always loved the silky little slips of it you get in miso soup but that was just about as far as my knowledge went. In fact, when I wanted to cook an Ottolenghi ‘Black Pepper Tofu’ recipe from Plenty I chose to do it with chicken. And FYI, that recipe, if you ever do it, firstly takes HOURS of prep and secondly is one of the most frighteningly spicy things I have ever created. The recipe calls for 8 chillies, but that’s nothing compared to adding 5 tablespoons of crushed black pepper. I was scraping my bleeding tongue in agony.

Anyway, I was keen to redo the Ottolenghi recipe with less pepper and this time with tofu and the result was truly delicious. The soft, blandness of the tofu set off the piquant, sparkly Asian flavours of the sauce perfectly. So this started me along a dangerously long road of research about tofu production. Home-made tofu is virtually unheard of in the UK. There seems to be a very small number of people in the US who make it themselves, and although their advice online is useful for research, it’s not particularly helpful in terms of getting hold of the stuff you need. The line up for equipment looks something like this:

A huge pot (or two big ones)
A cooking thermometer
A fine sieve
Muslin
Blender
A tofu press
Soy beans
Nigari (magnesium chloride)

And here’s a great video explaining what to do, made by a strangely compelling lady. I could watch her for hours (and I did). 

All a bit faffy. But most of the work seems to be associated with extracting the milk from the beans so I thought, in me old brain, that I would just buy some soya milk and start from there. One other hitch though was that despite two hours of googling I could not find a single retailer, online or in London, that sells nigari (the coagulant) at a reasonable price. This place seems alright (£3.58 for a kilo): http://www.naturallygoodfood.co.uk but their postage is £5.60. Maybe I’m tight but I didn’t really want to spend that much on a little bag of salt. I read online that an acceptable alternative to nigari is Epsom salt which can be bought at most chemists. So I went along to the pharmacy and duly got some. My equipment list now looked like this:

One saucepan
One tea-towel
1 litre cartoon of Alpro Soya Milk
Pot of Epsom Salts
Tupperware with holes stabbed through the bottom in place of a tofu press

I put the litre of milk in a pan and heated it for 5 minutes until it was steaming but not boiling. I mixed 2 teaspoons of Epsom salts into a little glass of water and added that. It started to coagulate immediately which was quite exciting but then nothing more happened. 


I added another glass of Epsom salt water and nothing. I heated it up a bit, I stirred it, I left it, but I could not get bigger curds to form. I then added yet another cup of Epsom mixture but I couldn’t get it to separate further and by that time I had probably added dangerous levels of salt to the mixture. Undeterred I poured it into my tea-towel-lined hole-riddled tupperware and let the liquid drain.


I should just mention that is process was utterly un-cost-effective since the milk cost £2. It was still incredibly faffy and without the satisfaction of engaging in a process likely to produce results.


And the verdict: absolutely inedible. The bf, who bravely tasted it, was shuddering with the memory of the flavour for some time. I’m afraid I am having to document an out-and-out failure. It seems to take about 5 hours to make tofu from soy beans and my conclusion, I am sorry to say, is that it’simply not worth it.

Potted Crab


The bf and I stumbled across East Street Market just off the Walworth Road yesterday. It’s great – a cross between the set of Eastenders and a Jamaican food market, and unbelievably cheap. After we had finished hyperventilating with excitement about buying six avocados for a pound we recklessly decided to buy some crabs – three of the little blighters for a fiver, still foaming at the mouth and clicking dismally. Once home we were relieved to discover that two of them had expired in my backpack. But one was still very much alive.

We googled methods of killing crabs humanely and found suggestions that included disembowelment, screwdriver through the brains, a stint in the freezer and a gentle stroke to the top of the head. We were feeling a bit pathetic by this point so we went for the freezer/caressing method and when it still seemed to be wide awake and looking at us with its wandering, googly eyes we decided to be brave and just plunge it into a vat of boiling water.

They weighed 500g each and so we boiled them for 12 minutes and then put them in cold water to stop them cooking further. To extract the meat we followed this method:

Twist off the claws
Grab all the legs on each side and twist them off too


Turn the crab upside down and push the bum of the crab so that it levers off without too much difficulty
Remove the body of the crab
Scrape the remaining innards out of the main shell, avoiding the browny green stuff. The bright orange eggs of the female are fine to eat.
Then cut the body in two and pick out all the little bits of meat.
Crack the claws and legs with the butt of a knife and pull out the meat.


I’m going to be completely honest and say it was a lengthy, fiddly process and three crabs only ended up producing about 330g of meat. But that’s enough for a bit of potting.

This is the recipe we went with, based on Hugh Fearnley-Whittingstall’s suggestions. 

330g crab
1 lemon
220g butter
1 bay leaf
½ tsp mace
½ tsp paprika
1 ½ tbsp chopped dill

1)      Put the meat in a bowl and add the juice of a lemon and some salt and pepper
2)      Melt the butter with the bay leaf and clarify by skimming off the white scum and then running it through a tea-towel-lined sieve.
3)      Sprinkle the spices into the melted butter and pour 80% of it onto the crab.
4)      Add the dill and stir it up.
5)      Pot into sterilised pots and top with the melted butter. Refrigerate.

This made 2 full ramekins and half a jar- enough for a starter for about 6 people.